How to create a CoinDCX API key
Connect your CoinDCX futures account and be protected in about five minutes. There is no extension to install — you create an API key on CoinDCX, bind it to our IP, and paste the key into TradeGuardX.
The CoinDCX screens, in order
Captions are the instruction — if an image has not loaded, the caption alone is enough to follow. Tap any screenshot to open it full size.
1Step 1 — Log in to CoinDCX and click the Profile icon, top right 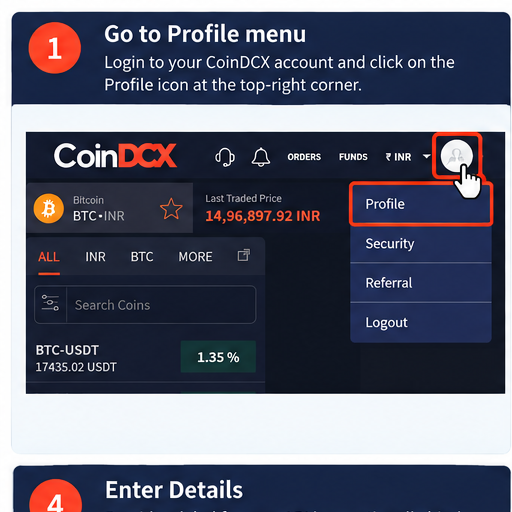 Open full size ↗
2Step 2 — In the left menu, click API Dashboard 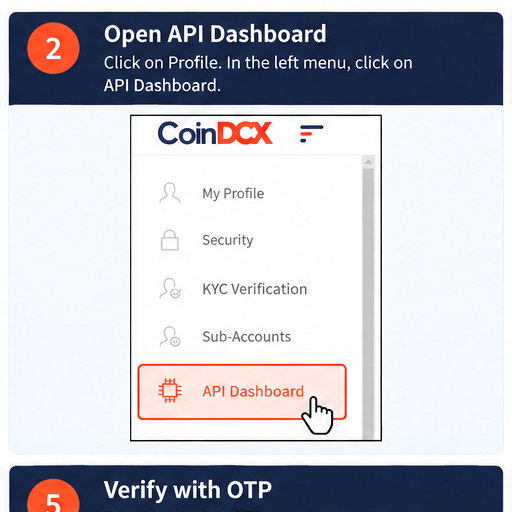 Open full size ↗
3Step 3 — Click Create API Key 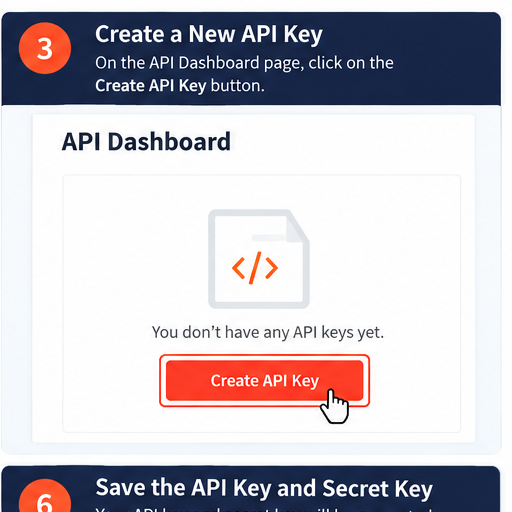 Open full size ↗
4Step 4 — Label the key, tick Bind IP Address, paste our IP, then Send OTP 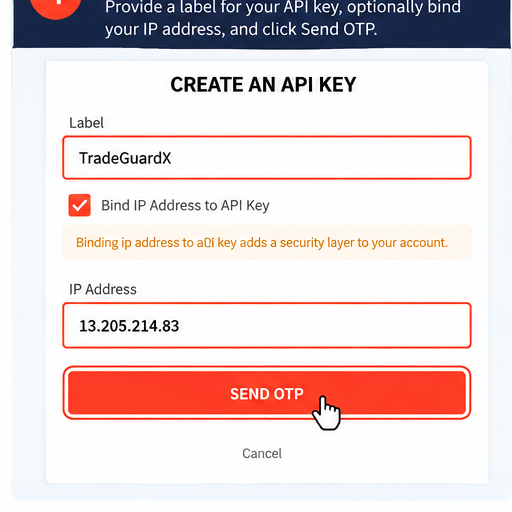 Open full size ↗
5Step 5 — Enter the codes CoinDCX emails and texts you 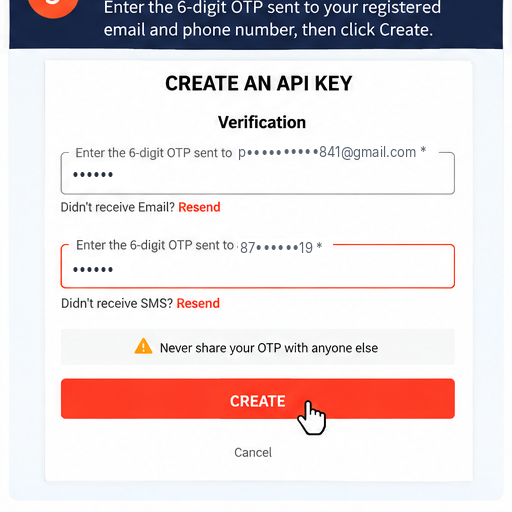 Open full size ↗
6Step 6 — Copy the API key and the secret now; the secret is hidden once you refresh 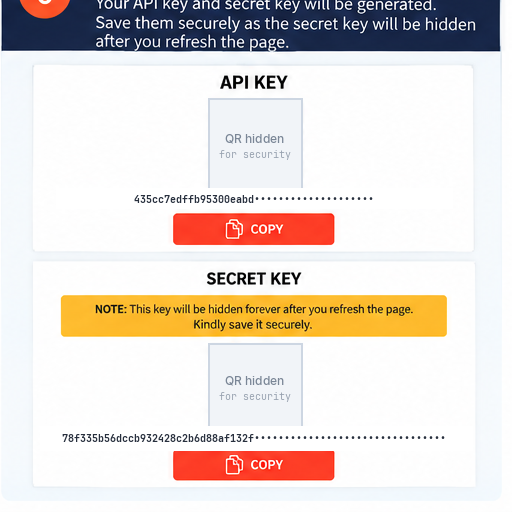 Open full size ↗
Before you start
- It has to be a desktop browser: CoinDCX has no create-key screen in their mobile app, and the flow needs a computer. Their limit, not ours.
- The secret is shown once: It is hidden the moment you refresh that page, and CoinDCX will not show it again. Copy both values before you navigate away.
- There is no permission to tick: CoinDCX's form has no trading checkbox. We verify the key can act when you connect it and say so if it cannot.
Set up CoinDCX — step by step
Follow these in order. The only part done outside TradeGuardX is creating the API key on CoinDCX.
- 1
Create your TradeGuardX account
Sign up at tradeguardx.com/signup with email or Google. No card is needed to start.
- 2
Start adding your CoinDCX account
In the dashboard, open Accounts → "Add trading account" and choose CoinDCX.
- Name the account. Keep this form open — it shows the IP you need to bind and is where you paste your key.
- The API Key and Secret are required to create the account, so you will finish this form in step 4.
- 3
Create an API key on CoinDCX
Open coindcx.com/create-api on a laptop or desktop (log in first). Their form is short:
- Log in on a laptop or desktop. CoinDCX has no create-key screen in their mobile app, so this cannot be done on a phone.
- Profile icon, top right → API Dashboard → Create API Key.
- Label — type anything you like (e.g. "TradeGuardX"). It is just a name.
- Bind IP Address to API key — tick this, then paste TradeGuardX's IP (13.205.214.83) into the field that appears. The key then works only from our engine and nowhere else.
- Send OTP — CoinDCX sends one code to your email and another by SMS. Enter both to confirm the key.
- Copy the API Key and Secret. Both are shown once, on that screen — the secret is hidden the moment you refresh.
There is no permission checkbox on CoinDCX's form, so there is nothing to tick for trading — do not go looking for one. We verify the key can actually act the moment you connect it, and tell you plainly if it cannot.
- 4
Connect the key in TradeGuardX
On the Add-account form, paste your API Key and Secret and create/connect.
- We validate the key against CoinDCX immediately and show the linked account on the Accounts card.
- If CoinDCX rejects it, the IP binding is the usual cause — the key must be bound to our IP exactly, or bound to nothing at all.
- Your secret is encrypted (KMS) before storage and is never shown again.
- 5
Confirm you're protected
The connection should read CONNECTED and the header shows a green "Protected" pill.
If it shows "Alerts only" or "Unprotected", the key cannot trade or the IP binding does not match — recreate the key and bind it to the IP shown on the panel.
- 6
Set your guardrails
Open Rules and configure the protections you want — daily loss limit, max trades per day, loss-streak cooldown, risk per trade, and more.
- Each rule has a "How it works" toggle explaining exactly what it does.
- Saving a tighter limit applies instantly; loosening one waits 24 hours (a cooling-off so you cannot weaken protection on impulse).
- 7
Trade — you're covered
Open the Live tab to watch your session in real time: status, guardrail meters, and activity. If a rule is breached, the kill switch cancels your orders, closes your positions, and locks the account with an unlock countdown.